Difference between revisions of "SC Hull"
Navykisysop (talk | contribs) |
(→Check list SC Hull) |
||
| (19 intermediate revisions by 3 users not shown) | |||
| Line 36: | Line 36: | ||
'''Edge margin''' 50mm | '''Edge margin''' 50mm | ||
| − | == Check list SC | + | == Check list SC Hull == |
| Line 66: | Line 66: | ||
***Indicate sightline angle | ***Indicate sightline angle | ||
***Sightline arrow direction to CL or UP | ***Sightline arrow direction to CL or UP | ||
| − | ***Bow fashion CL template to have an arrow indicating the top | + | ***Bow fashion CL template to have an arrow indicating the top - keep inside template |
| + | |||
| + | == File import and preparation before expansion == | ||
| − | |||
| − | |||
| − | |||
[[Image:Nurbs import.jpg]] | [[Image:Nurbs import.jpg]] | ||
| − | + | *1.Set Surface Properties: | |
| − | + | **a.Name required for templates only | |
| − | + | **b.correct Stock properties | |
| − | + | **c.correct Throw | |
| − | 1. Set Surface Properties: | + | **d.Mode ‘Solid’’ |
| − | a. Name required for templates only | + | **e.solines ‘None’ |
| − | b. correct Stock properties | + | **f.colour conform stock |
| − | c. correct Throw | + | **g.correct Markside |
| − | d. Mode ‘Solid’’ | + | *2.Create Cut Sections (settins as for Reference Lines in Structure) |
| − | e. | + | *3.Create Marklines, settings (Edit Labels): |
| − | f. colour conform stock | + | [[Image:Labeling.jpg]] |
| − | g. correct Markside | ||
| − | 2. Create Cut Sections (settins as for Reference Lines in Structure) | ||
| − | 3. Create Marklines, settings (Edit Labels): | ||
| − | |||
| − | |||
| − | |||
| − | |||
| − | |||
| − | |||
| − | |||
| − | |||
| − | |||
| − | |||
| − | |||
| − | |||
| − | |||
| − | |||
| − | |||
| − | |||
| − | |||
| − | |||
| − | |||
| − | |||
| − | |||
| − | |||
| − | |||
| − | |||
| − | |||
| − | |||
| − | |||
| − | |||
| − | |||
| − | |||
| − | |||
| − | |||
| − | |||
| − | |||
| − | |||
| − | |||
| − | |||
| − | |||
| − | |||
| − | |||
| − | |||
| − | |||
| − | |||
| − | |||
| − | |||
| − | |||
| − | |||
| − | |||
| − | |||
| − | |||
| − | |||
| − | |||
| − | |||
| − | |||
| − | [[ | ||
| − | |||
| − | |||
| − | |||
| − | |||
| − | |||
| + | *4.Name at least the following Marklines: | ||
| + | **a.deck at side | ||
| + | **b.tankt at side | ||
| + | *5.Split surfaces when they do not fit the stock | ||
| + | Note: do not toggle on the labels for the solids since they will appear also in the 3D solid model in the unit. | ||
| + | == Plate expansion without templates == | ||
| + | When the surface has single curvature which is not too strong, then templates are not required. | ||
| + | *Plate Expansion Settings: | ||
| + | [[Image:plate exp general.jpg]] [[Image:plate exp template.jpg]] [[Image:plate exp add stock.jpg]] | ||
| + | [[Image:plate exp icon.jpg]] | ||
| + | *With plate strains >1% ShipConstructor sometimes becomes inaccurate, check by measuring framelines and/or contourlines and compare them with the same lines in Rhinoceros. | ||
| + | *Toggle labels ON for Sections of the expanded surface | ||
| + | *Arrange the expanded plates for a suitable lay out in the Approval drawing. | ||
| + | == Plate expansion with standard templates == | ||
| + | When the surface has double curvature or single curvature but strong, templates are required. | ||
| + | *Templates must be concave, when the surface is convex, the Surface Side for the templates must be Thick Side instead of Mold Side. | ||
| + | *When the Surface Sside is Mold Side, the text ‘Contra Templates’ must be added to the plate and it’s templates (in CrvPlate group). | ||
| + | *Alignment icons must all indicate in the same direction within a project. | ||
| + | *Plate Expansion Settings: | ||
| + | [[Image:Plate exp standard template.jpg]] | ||
| + | '''Guidelines''' | ||
| + | *The stonger the curvature, the more templates required | ||
| + | *Use framelins for the templates as much as possible | ||
| + | *With strong curvature, the distance of the template to the end of the surface should not exceed 100mm, create additonal sections if required | ||
| + | *Names for additonal sections for templates to be ‘T01’, ‘T02’, etc. | ||
| + | == Plate expansion with bow fashion templates == | ||
| + | Use bow fashion templates for symmetrical surfaces with the neutral axis on the centerline, for example flared bows. | ||
| + | *See ‘Plate expansion with standard templates’ | ||
| + | *Plate Expansion Settings: | ||
| + | |||
| + | [[Image: bow fashion template.jpg]] | ||
| + | '''Check''' | ||
| + | *Plate and Section names are toggled ON for expanded plate | ||
| + | *Templates have Plate Name, Marking Line Name and Bracket Angle | ||
| + | *Templates are concave | ||
| + | *Alignment icon all indicate in same direction | ||
| + | *No double sightlines on plate (occur when the same plate is expanded several times) | ||
| + | *Presence of Orientation Icon | ||
| + | *Aiignment icon indicates correct side (especially with templates at Thick Side, ShipConstructor sometimes indicate wrong) | ||
| + | *Several dimensions of expanded plate, especially with a lot of curvature (framelines, contour) and see if they match in Rhino. | ||
| + | *When the strain indicates that the plate will shrink, meaning it will be too short after forming, stock must be added in the Curved Plate Group. | ||
| − | [[Category:ShipConstructor]] | + | [[Category: ShipConstructor]] |
Latest revision as of 12:03, 6 October 2009
Contents
[hide]Surfaces and expansions[edit]
How to position in the drawing
Templates[edit]
Templates are required for plates which need mechanical processing (bending or forming) to obtain the desired shape.
We need templates in the following situations:
- Single curvature (bending) with constant radius - no template required, give bending info on plate.
- Single curvature (bending) without constant radius - 1 template required.
- Double curvature (forming) - minimum 3 templates required.
Template types
- Bow Fashion - for plates which are on the center line and have symmetry around the center line (for example a bow cone)
- Standard - all other plates:
- Create the templates on the reference lines, as perpendicular to the surface as possible, or if this is not applicable:
- Use Auto-Level
Template label
- Plate Name
- Marking Line Name
- Bracket Angle
Template name is plate name + reference line name or, when using Auto-Level, plate name + T1 (T2, T3, etc.)
Template style is Plate
Edge margin 50mm
Check list SC Hull[edit]
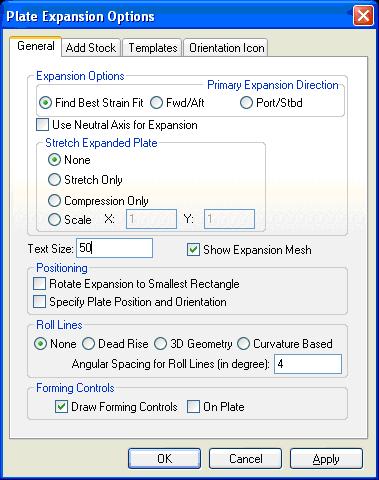
- Expansion settings
- General
- Expansion Option Find Best Strain Fit
- Stretch Expanded Plate None
- Text size 50
- Roll Lines None
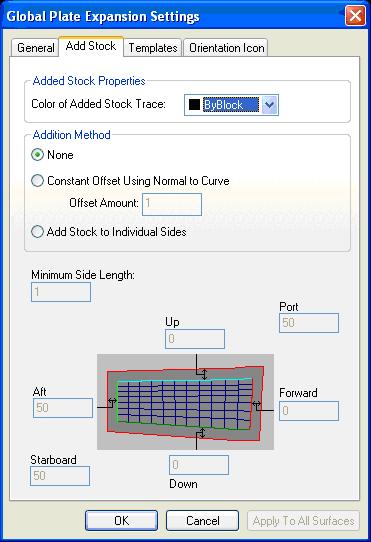
- Add Stock
- None
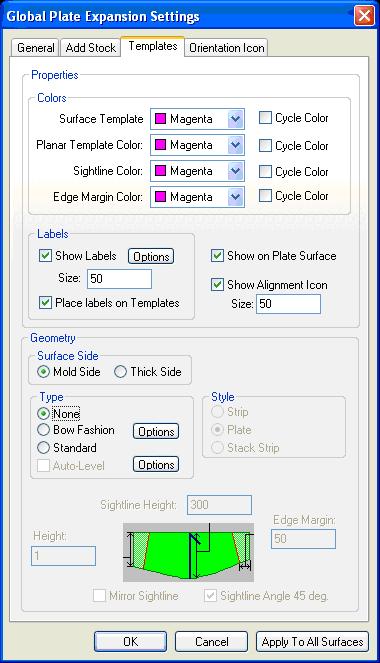
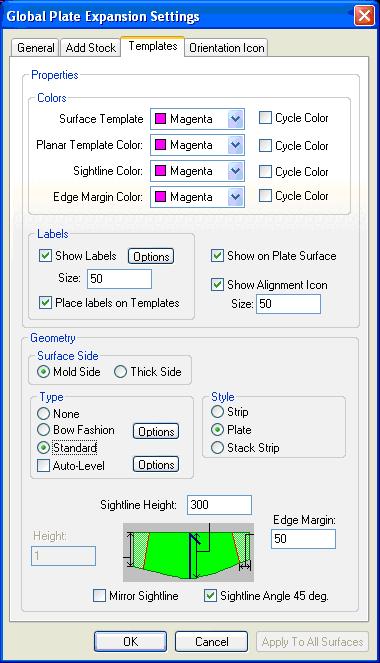
- Templates
- Show label Plate name, Marking Line Name
- Label size 50
- Place labels on templates
- Show on Plate Surface
- Show Alignment Icon, Size 50
- Surface Side Mold Side
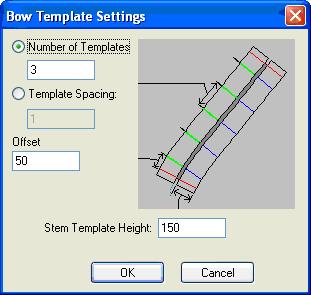
- Type Bow Fashion for templates with symmetry at CL, or
- Type Standard for templates with non-symmetry at CL, then
- use reference lines for templates
- use Auto-Level templates only when:
- the shape is not sufficient defined with reference lines
- the angle of the templates at the plate becomes to small
- Style Plate
- Template name is plate name + reference line name, or
- Template name is plate name + marking line name (T1, T2, etc.)
- No Edge Margin
- Indicate sightline angle
- Sightline arrow direction to CL or UP
- Bow fashion CL template to have an arrow indicating the top - keep inside template
- General
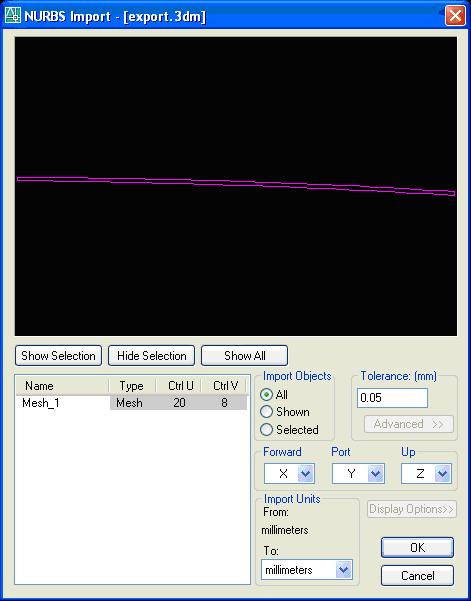
File import and preparation before expansion[edit]
- 1.Set Surface Properties:
- a.Name required for templates only
- b.correct Stock properties
- c.correct Throw
- d.Mode ‘Solid’’
- e.solines ‘None’
- f.colour conform stock
- g.correct Markside
- 2.Create Cut Sections (settins as for Reference Lines in Structure)
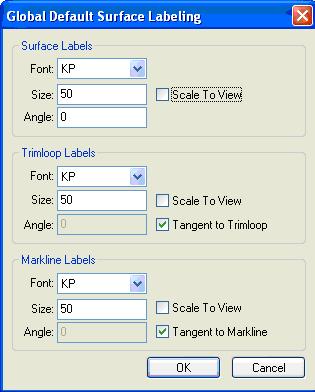
- 3.Create Marklines, settings (Edit Labels):
- 4.Name at least the following Marklines:
- a.deck at side
- b.tankt at side
- 5.Split surfaces when they do not fit the stock
Note: do not toggle on the labels for the solids since they will appear also in the 3D solid model in the unit.
Plate expansion without templates[edit]
When the surface has single curvature which is not too strong, then templates are not required.
- Plate Expansion Settings:
- With plate strains >1% ShipConstructor sometimes becomes inaccurate, check by measuring framelines and/or contourlines and compare them with the same lines in Rhinoceros.
- Toggle labels ON for Sections of the expanded surface
- Arrange the expanded plates for a suitable lay out in the Approval drawing.
Plate expansion with standard templates[edit]
When the surface has double curvature or single curvature but strong, templates are required.
- Templates must be concave, when the surface is convex, the Surface Side for the templates must be Thick Side instead of Mold Side.
- When the Surface Sside is Mold Side, the text ‘Contra Templates’ must be added to the plate and it’s templates (in CrvPlate group).
- Alignment icons must all indicate in the same direction within a project.
- Plate Expansion Settings:
Guidelines
- The stonger the curvature, the more templates required
- Use framelins for the templates as much as possible
- With strong curvature, the distance of the template to the end of the surface should not exceed 100mm, create additonal sections if required
- Names for additonal sections for templates to be ‘T01’, ‘T02’, etc.
Plate expansion with bow fashion templates[edit]
Use bow fashion templates for symmetrical surfaces with the neutral axis on the centerline, for example flared bows.
- See ‘Plate expansion with standard templates’
- Plate Expansion Settings:
Check
- Plate and Section names are toggled ON for expanded plate
- Templates have Plate Name, Marking Line Name and Bracket Angle
- Templates are concave
- Alignment icon all indicate in same direction
- No double sightlines on plate (occur when the same plate is expanded several times)
- Presence of Orientation Icon
- Aiignment icon indicates correct side (especially with templates at Thick Side, ShipConstructor sometimes indicate wrong)
- Several dimensions of expanded plate, especially with a lot of curvature (framelines, contour) and see if they match in Rhino.
- When the strain indicates that the plate will shrink, meaning it will be too short after forming, stock must be added in the Curved Plate Group.
