Difference between revisions of "Rhinoceros"
(→Useful Commands) |
|||
| (43 intermediate revisions by 6 users not shown) | |||
| Line 1: | Line 1: | ||
| − | + | [http://www.rhino3D.com Rhino3D] is a 3D surface modeling application. | |
| − | == Manuals == | + | == Manuals, Training and Support== |
Digital | Digital | ||
*see \Home\Manuals\Rhinoceros | *see \Home\Manuals\Rhinoceros | ||
| + | *[http://www.rhino3d.com/training.htm Rhino - Training] | ||
| + | *[http://en.wiki.mcneel.com/default.aspx/McNeel/RhinoHome.html Rhino Wiki Homepage] | ||
| + | *[http://www.rhinocentre.nl Rhinocentre NL] tutorials | ||
| + | *[http://rhinocentre.blogspot.com In-depth articles regarding Rhinoceros 3d modeling software] | ||
| − | + | Paper | |
*Rhinoceros 3.0 User's Guide | *Rhinoceros 3.0 User's Guide | ||
*Inside Rhinoceros 4 | *Inside Rhinoceros 4 | ||
| + | *What's New in Rhino 4 | ||
| + | *Rhino 4.0 Upgrade Training Manual | ||
| + | == Unit settings == | ||
| − | == | + | [[Image:Rhino option.jpg]] |
| − | * [ | + | |
| − | * | + | |
| + | == Export settings: DWG format == | ||
| + | |||
| + | RHINO 3 | ||
| + | |||
| + | [[Image:Export Rhino3.jpg]] | ||
| + | |||
| + | |||
| + | RHINO 4 | ||
| + | |||
| + | [[Image:Export Rhino4.jpg]] | ||
| + | |||
| + | [[Image:Export Rhino4 second tab.JPG]] | ||
| + | |||
| + | == Export settings: 3DM file format == | ||
| + | |||
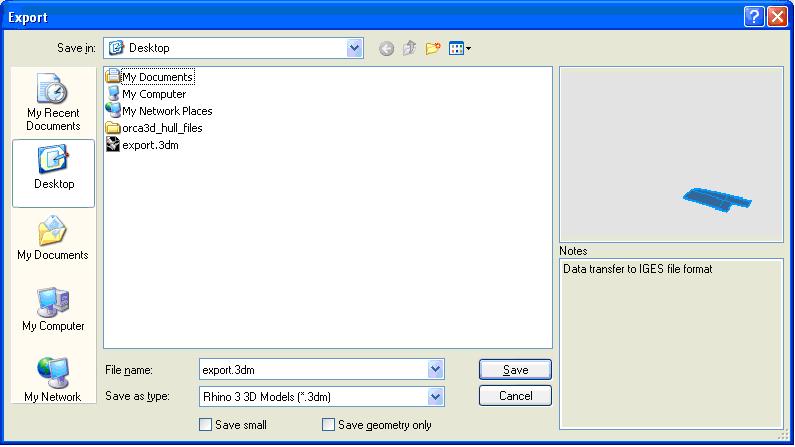
| + | For exporting surfaces to ShipConstructor Hull the 3DM file format is used. Save these files as Rhino 3 3D Models (Rhino 4 3D Models are not accepted by ShipConstructor). | ||
| + | |||
| + | [[Image:Export.jpg]] | ||
| + | |||
| + | == Preparing surfaces for expansion in ShipConstructor Hull and creating a solid model== | ||
| + | |||
| + | Use the following layers: | ||
| + | *'''Marking lines''' - Layer for all the lines which must be marked on the plate. Layer color green. Used for export to ShipConstructor Hull. | ||
| + | *'''Trim lines''' - Layer for all the lines used to trim surfaces. Layer color cyan. | ||
| + | *'''Surfaces''' (or Hull, Superstructure, etc.) - Layer for the original, unmodified, surfaces from the surface model. | ||
| + | *'''PL04 ST''' ''(example)'' - Layer for all the trimmed surfaces with these properties, ready for export to ShipConstructor Hull. Color conform plate thickness (see [[Link title]]), layer color to be black, surfaces to have the correct color (otherwise in ShipConstructor Hull the color must be set again). Used for expansion in ShipConstructor Hull | ||
| + | *'''Solids''' - Layer for the solids created from the prepared surfaces. Used for exporting curved plates to AutoCad and creating a DWF file. | ||
| + | |||
| + | == New Tricks == | ||
| + | |||
| + | Displacement of object/surface on a certain object/surface plane: | ||
| + | *It is useful if you have an objet/surface that you want to displace it on an already defined object/surface | ||
| + | |||
| + | *Go to: Transform->Orient->3 Points | ||
| + | *Select desired object1/surface1 needed to be displaced | ||
| + | *Choose 3 points on this object1/surface1 so that you define the plane of choice (Reference Points) | ||
| + | *Choose 3 points on the object2/surface2 that you wish to place the first object1/surface1 (Target Points) | ||
| + | |||
| + | == Gradient background colors == | ||
| + | Select ''Options > View > Display modes > Shaded (for example) > Viewport settings > background'' then choose ''gradient 2 colors''. | ||
| + | [[Category: Rhinoceros]] [[Category:Software]] | ||
| + | |||
| + | |||
| + | == Useful Commands == | ||
| + | |||
| + | |||
| + | *'''_SetObjectDisplayMode''' | ||
| + | |||
| + | Copy paste it into your rhino command. | ||
| + | It allows you to have a ghosted or wireframe object, in any view mode (shaded, wireframe, ghosted, etc..) | ||
| + | |||
| + | It is useful as: | ||
| + | - trying to see the frames through the ghosted hull without changing to ghosted view mode | ||
| + | - trying to see inside the interior, without hiding parts, or changing to ghosted view mode | ||
| + | |||
| + | You can set it to different modes (wireframe, xray, ghosted, shaded, rendered) | ||
| + | |||
| + | If you wish to make a button here is what you need to copy paste in there: | ||
| + | |||
| + | ''_SetObjectDisplayMode _Pause _M _Ghosted'' | ||
| + | |||
| + | For the other types change the "Ghosted" to whatever you need. | ||
| + | |||
| + | It works also with Workession modes | ||
| + | |||
| + | *''' Worksession ''' | ||
| + | |||
| + | It works in the same manner as Xref in AutoCAD | ||
| + | Useful to work with small amount of objects, while referencing others. | ||
| + | In this way, you can split the work by assemblies (for interior), or to have one rhino file with hull objects and another rhino file with structure objects. | ||
| + | |||
| + | *'''_SetDocumentUserText''' | ||
| + | |||
| + | Useful to Layouts. | ||
| + | With this command you can add Key (text) and a value to this key (text). | ||
| + | |||
| + | When having multiple Layouts, you will have to change the Titleblock's objects such as Name, date, project code, etc.. | ||
| + | Using the text that has this option, DocumentUserText, you can fill in one time, the entire Layout pack. | ||
| + | |||
| + | For example : | ||
| + | |||
| + | Type the command | ||
| + | For Key, write "Name", press Enter. | ||
| + | Add the text value "Tiberiu", press Enter. | ||
| + | |||
| + | Choose a text object. | ||
| + | In the text properties, select the ''TextField'' option. | ||
| + | A new window will appear, and choose '''DocumentText''' from where you will select the desired Key. | ||
| + | |||
| + | '''To change the Value in the future:'''. | ||
| + | Type again the command, insert the Key (e.g. Name), and then the new Value (e.g. Marius). | ||
| + | It will change automatically the text inside all the Layouts. | ||
Latest revision as of 08:47, 12 June 2014
Rhino3D is a 3D surface modeling application.
Contents
[hide]Manuals, Training and Support[edit]
Digital
- see \Home\Manuals\Rhinoceros
- Rhino - Training
- Rhino Wiki Homepage
- Rhinocentre NL tutorials
- In-depth articles regarding Rhinoceros 3d modeling software
Paper
- Rhinoceros 3.0 User's Guide
- Inside Rhinoceros 4
- What's New in Rhino 4
- Rhino 4.0 Upgrade Training Manual
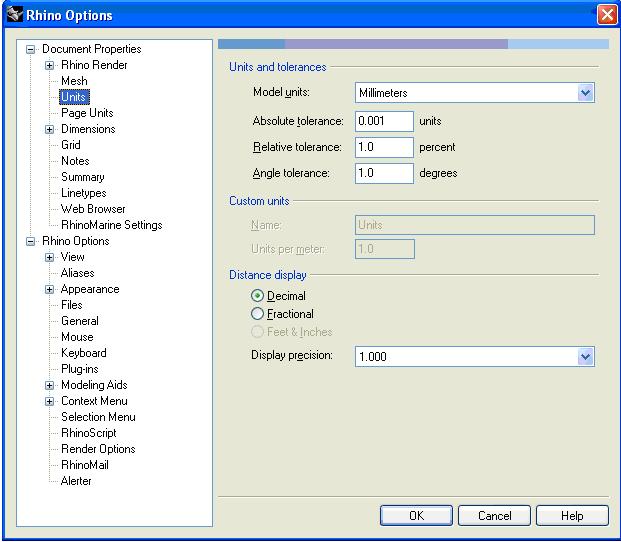
Unit settings[edit]
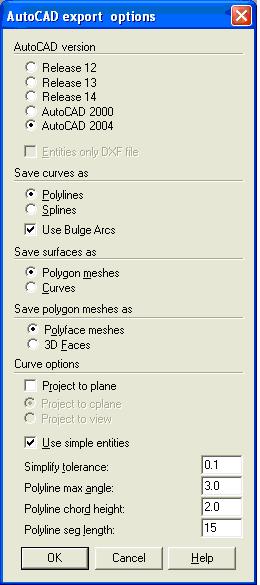
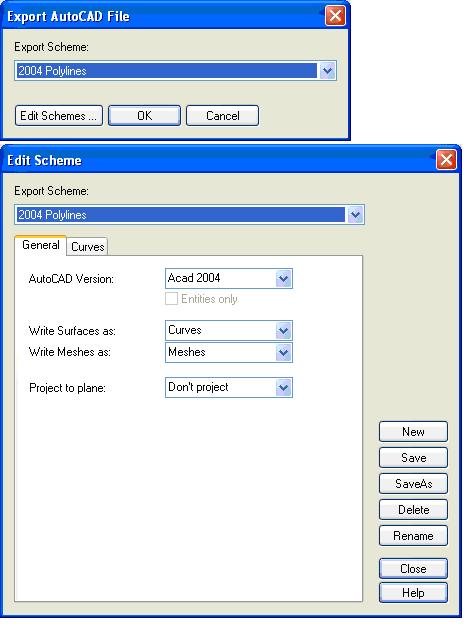
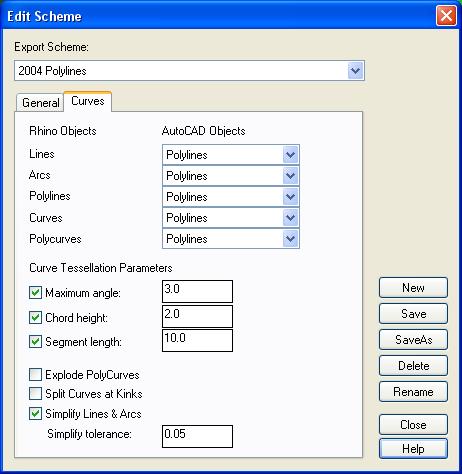
Export settings: DWG format[edit]
RHINO 3
RHINO 4
Export settings: 3DM file format[edit]
For exporting surfaces to ShipConstructor Hull the 3DM file format is used. Save these files as Rhino 3 3D Models (Rhino 4 3D Models are not accepted by ShipConstructor).
Preparing surfaces for expansion in ShipConstructor Hull and creating a solid model[edit]
Use the following layers:
- Marking lines - Layer for all the lines which must be marked on the plate. Layer color green. Used for export to ShipConstructor Hull.
- Trim lines - Layer for all the lines used to trim surfaces. Layer color cyan.
- Surfaces (or Hull, Superstructure, etc.) - Layer for the original, unmodified, surfaces from the surface model.
- PL04 ST (example) - Layer for all the trimmed surfaces with these properties, ready for export to ShipConstructor Hull. Color conform plate thickness (see Link title), layer color to be black, surfaces to have the correct color (otherwise in ShipConstructor Hull the color must be set again). Used for expansion in ShipConstructor Hull
- Solids - Layer for the solids created from the prepared surfaces. Used for exporting curved plates to AutoCad and creating a DWF file.
New Tricks[edit]
Displacement of object/surface on a certain object/surface plane:
- It is useful if you have an objet/surface that you want to displace it on an already defined object/surface
- Go to: Transform->Orient->3 Points
- Select desired object1/surface1 needed to be displaced
- Choose 3 points on this object1/surface1 so that you define the plane of choice (Reference Points)
- Choose 3 points on the object2/surface2 that you wish to place the first object1/surface1 (Target Points)
Gradient background colors[edit]
Select Options > View > Display modes > Shaded (for example) > Viewport settings > background then choose gradient 2 colors.
Useful Commands[edit]
- _SetObjectDisplayMode
Copy paste it into your rhino command. It allows you to have a ghosted or wireframe object, in any view mode (shaded, wireframe, ghosted, etc..)
It is useful as: - trying to see the frames through the ghosted hull without changing to ghosted view mode - trying to see inside the interior, without hiding parts, or changing to ghosted view mode
You can set it to different modes (wireframe, xray, ghosted, shaded, rendered)
If you wish to make a button here is what you need to copy paste in there:
_SetObjectDisplayMode _Pause _M _Ghosted
For the other types change the "Ghosted" to whatever you need.
It works also with Workession modes
- Worksession
It works in the same manner as Xref in AutoCAD Useful to work with small amount of objects, while referencing others. In this way, you can split the work by assemblies (for interior), or to have one rhino file with hull objects and another rhino file with structure objects.
- _SetDocumentUserText
Useful to Layouts. With this command you can add Key (text) and a value to this key (text).
When having multiple Layouts, you will have to change the Titleblock's objects such as Name, date, project code, etc.. Using the text that has this option, DocumentUserText, you can fill in one time, the entire Layout pack.
For example :
Type the command For Key, write "Name", press Enter. Add the text value "Tiberiu", press Enter.
Choose a text object. In the text properties, select the TextField option. A new window will appear, and choose DocumentText from where you will select the desired Key.
To change the Value in the future:. Type again the command, insert the Key (e.g. Name), and then the new Value (e.g. Marius). It will change automatically the text inside all the Layouts.
